Microtestmachines Co.
microtm.comMicrotestmachines Co. ::: Products ::: SPM (AFM) NT-206


::: NT-206 :::
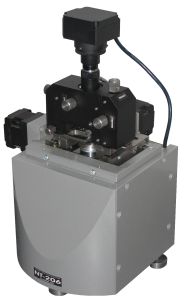
Multifunctional scanning probe microscope
(atomic force microscope)
 
DESCRIPTION
 

Multifunctional scanning probe
microscope NT-206 is an atomic force microscope in a complex with hardware and software enabling analysis of topography and micromechanical properties of solid surfaces with nanometer resolution.

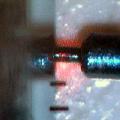
Positioning probe over journal neck of watch gear
A probe is positioned above journal neck of watch gear

Embedded videosystem in combination with motorized XY micropositioning stage provide convenient tuning of the instrument and its fine targeting onto the features on the sample surface. All that dramatically enhances the instrument's functionality when researching micro- and nanosize objects.

To meet requirements of specific research tasks, AFM NT-206 can include specialized changeable probe holders for microtribometry and adhesiometry or for nanoindentation.


FEATURES
 

Measurement modes:


Motion patterns at the measurements:
- area (matrix);
- line;
- single point.

  1. Contact static AFM
  2. Lateral force microscopy /with contact static AFM/
  3. Non-contact dynamic AFM
  4. Intermittent contact AFM (similar to Tapping Mode®)
  5. Phase contrast imaging /with intermittent contact AFM/
  6. Two-pass mode (for static and dynamic AFM)
  7. Two-pass mode with varying separation (for static and dynamic AFM) /Original technique!/
  8. Multicycle scanning (for static and dynamic AFM) /Original technique!/
  9. Multilayer scanning with varying load (for static and dynamic AFM) /Original technique!/
  10. Electrostatic force microscopy (two-pass technique) *, **
  11. Current mode *, **
  12. Magnetic force microscopy (two-pass technique) *, **
  13. Static force spectroscopy (with calculation of quantitative parameters, surface energy and elastic modulus in the measurement point)
  14. Dynamic force spectroscopy
  15. Dynamic frequency force spectroscopy /Original technique!/
  16. Nanoindentation *
  17. Nanoscratching *
  18. Linear nanowear *
  19. Nanolithography (with control of <i> load, <ii> depth and <iii> bias voltage) *
  20. Microtribometry * /Original technique!/
  21. Microadhesiometry * /Original technique!/
  22. Shear-force microtribometry * /Original technique!/
  23. Temperature-dependent measurements (under all above modes) *

Note.
* - Specialized accessories or rig required
** - Specialized probes required

Scan field area: from 5x5 micron up to 50x40 microns
Maximum range of measured heights: from 2 to 4 micron
Lateral resolution (plane XY): 1–5 nm (depending on sample hardness)
Vertical resolution (direction Z): 0.1–0.5 nm (depending on sample hardness)
Scanning matrix: Up to 1024x1024 points
Scan rate: 40–250 points per second in X-Y plane
Nonlinearity correction : A software nonlinearity correction provided
Minimum scanning step: 0.3 nm
Scanning scheme: The sample is moved in X-Y plane (horizontal) and in Z-direction (vertical) under stationary probe.
Scanner type: A piezoceramic tube.
Cantilevers (probes): Commercial AFM cantilevers of 3.4x1.6x0.4 mm.
Recommended are probes from Mikromasch or NT-MDT. Checked for operation with probes by BudgetSensor and Nanosensors
Cantilever deflection detection system: Laser beam scheme with four-quadrant position-sensitive photodetector
Sample size: Up to 30x30x8 mm (w–d–h); extending block insert allows measurement of samples with height up to 35 mm
High voltage amplifier output: +190 V
ADC: 16 bit
Operation environment: Open air, 760+40 mm Hg col., T = 22+4°С, relative humidity <70%
Range of automated movement of measuring head: 10x10 mm in XY plane for micropositioning of probe relative measured sample at step 2.5 micron with optical visual monitoring
Overall dimensions: Scanning unit: 185x185x290 mm
Control electronic unit: 195x470x210 mm
Field of view of embedded videosystem: 1x0.75 mm, visualization window 640x480 pixel, frame rate up to 30 fps.
Vibration isolation: Additional antivibration table is recommended
Host computer: Not less than: Celeron® 2.2, RAM 256 MB, HDD 80 GB, VRAM 128 MB, monitor 17" 1024x768x32 bit, Windows® XP SP1, 2 USB port.
Recommended:  Core i5 or equivalent, RAM 2 GB, HDD 320 GB, VRAM 1 GB, monitor 1600x1200x32 bit, Windows® XP SP2 or higher, 2 free USB port.
Software: Special control software SurfaceScan and the AFM image processing package SurfaceView / SurfaceXplorer are included.
     * Before measurements, the probe can be positioned to necessary place over the sample with help of automated motorized stage. To provide monitoring for the scan area and objects below the probe, the instrument embeds a videosystem allowing to watch the probe motion over the sample surface. Videosystem and the motorized stage for the probe positioning over sample are included in base set by default. A combination of these two options allows rather flexible selection of objects to be measured on the sample surface at direct visual monitoring by the opeartor.
 
 
DELIVERY SET
 ::: BASIC SET

Scanning unit (atomic force microscope)

Includes a base platform with embedded XY positioning stage and a detachable measuring head with integrated video system

Control electronic unit
with the connetcion cables in the set
(the case variants)

Software package including:

The software runs under Win32. Supplied on CD. Updates available at this site in section
ARCHIVE
> SOFTWARE
AFM control software SurfaceScan for driving complex and data acqusition and visualization .
SurfaceView and SurfaceXplorer software package for the measured data processing, visualization and analysis.
The software can include plug-ins for processing AFM-data obtained with other microscopes.
A set of drivers for connection of control electronic unit with host PC and running videosystem.
Note:
1 Base set includes also the control software (for Win32) and user manual.
 ::: ADDITIONAL ACCESSORIES (optional)
Suspension rack A specialized antivibration rack A changeable probe holder
Relaceable scanners Changeable scaners for ranges:
5x5x2 um
10x10x3 um
20x20x3.5 um
40x40x3.5 um
50x50x3.5 um
90x90x3.5 um
Set for scanning the sample emmersed in liquid medium
Thermocell Thermocell: a changeable sample platform for measured sample heating up to 150 °С with stand-allone controller A changeable holder for conducting probes
Extending insertion Extending block insert allowing measurement of thick samples with height up to 35 mm A changeable microtribometer-adhesiometer unit
Option: a set of AFM probes
(Prod. by Mikromasch)
A changeable shear-force microtribometer unit
Option: a set of calibration test gratings
(Prod. by Mikromasch)
A changeable nanoindentor unit
 
SOFTWARE

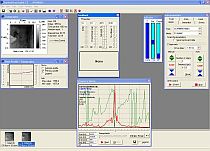
Control software  running on 19-inch screenControl software for AFM NT-206 SurfaceScan is a 32-bit Windows application.
It runs under Windows XPsp2/Vista/7 operating systems.

The control software provides all preliminary tunings and settings necessary for the AFM operation: visual control over the laser-beam detection system adjustment, tuning of the cantilever oscillations (in dynamic modes), feed-back system adjusting, sample positioning under the probe and sample approach to the probe before measurements and removal after the measurements. A full-field or any reduced area within the full field of the scanner can be selected for measurements.

Operator can watch any combination of acquired AFM/LFM images in data visualization window or switch to look at them in one window. Additionally, profile of currenly acquired line can be monitored as well.

Acquired data are saved in files of special format that can be then processed, visualised (in 2-D and 3-D presentation) and analysed with a specialized software package SurfaceView or SurfaceXplorer.

 
Copyright © 2006-2013, Microtestmachines Co.
All rights reserved.